Create A WPBakery Visual Composer Add-On
If you’ve ever used WPBakery Visual Composer while building a website, which we are sure most of you have. You’ve probably thought at least one time that it would be nice to build your own custom Visual Composer Add-on.
Well, this tutorial will explain how to do just that. Note: This will only work if you have Visual Composer already integrated into your theme.
For this example we will be building a Directory addon to Visual Composer that will make it easy to add a list of businesses/products and their information to your website. However, you can pretty much use our example for a number of useful things. Now, let’s get started!
Don't Want To Touch Any Code?
Have one of our WordPress Experts add the following code snippets for you. Chill out while we do the hard work.
Get HelpWhere to add your code
There are a few different ways you can add the code to create your own custom WPBakery Visual Composer add-on. The way we are going to approach it however is by create a custom WordPress plugin so if would like to reuses this add-on for other website builds it will be super easy.
So to get started, let’s open up your websites FTP and under /wp-content/plugins/ let’s create a new folder called wpc-directory.

The next step, we are going to open the new folder wpc-directory we just created and add two new files.
- The first file we will call it wpc-directory.php and this will be our main plugin file.
- The second file we are going to create is vc-directory-element.php. This will be the framework for our custom WPBakery Visual Composer add-on.
Now that we have created those two files, let’s open wpc-directory.php and past in the following code:
<?php

/*
Plugin Name: WPC Directory
Plugin URI: https://wpcodeus.com/
Description: An extension for Visual Composer that display an community directory option
Author: WP Codeus
Version: 1.0.0
Author URI: https://wpcodeus.com/
*/


// If this file is called directly, abort

if ( ! defined( 'ABSPATH' ) ) {
     die ('Silly human what are you doing here');
}


// Before VC Init

add_action( 'vc_before_init', 'wpc_vc_before_init_actions' );

function wpc_vc_before_init_actions() {

// Require new custom Element

include( plugin_dir_path( __FILE__ ) . 'vc-directory-element.php');

}

// Link directory stylesheet

function wpc_community_directory_scripts() {
    wp_enqueue_style( 'wpc_community_directory_stylesheet',  plugin_dir_url( __FILE__ ) . 'styling/directory-styling.css' );
}
add_action( 'wp_enqueue_scripts', 'wpc_community_directory_scripts' );
Code Explanation
- Line 22 we added an action to the the vc_before_init VC hook, so are function will be called VC init
- Line 28 we include the file we just created vc-directory-element.php and to find its absolute path we used include( plugin_dir_path( __FILE__ )
After you have pasted in the code above let’s go ahead and save that, and open our next file called vc-directory-element.php. Now we can finally start building the WPBakery Visual Compose Add-on!
Initialize your new Element
Now you should have the file vc-directory-element.php open. Go ahead and paste in the code below:
<?php

/**
* Adds new shortcode "info-box-shortcode" and registers it to
* the WPBakery Visual Composer plugin
*
*/


// If this file is called directly, abort

if ( ! defined( 'ABSPATH' ) ) {
    die ('Silly human what are you doing here');
}


if ( ! class_exists( 'vcInfoBox' ) ) {

	class vcInfoBox {


		/**
		* Main constructor
		*
		*/
		public function __construct() {

			// Registers the shortcode in WordPress
			add_shortcode( 'info-box-shortcode', array( 'vcInfoBox', 'output' ) );

			// Map shortcode to Visual Composer
			if ( function_exists( 'vc_lean_map' ) ) {
				vc_lean_map( 'info-box-shortcode', array( 'vcInfoBox', 'map' ) );
			}

		}


		/**
		* Map shortcode to VC
    *
    * This is an array of all your settings which become the shortcode attributes ($atts)
		* for the output.
		*
		*/
		public static function map() {
			return array(
				'name'        => esc_html__( 'Listing', 'text-domain' ),
				'description' => esc_html__( 'Add new listing', 'text-domain' ),
				'base'        => 'vc_infobox',
				'category' => __('WPC Directory', 'text-domain'),
				'icon' => plugin_dir_path( __FILE__ ) . 'assets/img/note.png',
				'params'      => array(
					array(
						'type'       => 'attach_image',
						'holder' => 'img',
						'heading' => __( 'Image', 'text-domain' ),
                        'param_name' => 'bgimg',
						// 'value' => __( 'Default value', 'text-domain' ),
                        'admin_label' => false,
                        'weight' => 0,
                        'group' => 'Listing',
					),

					array(
                        'type' => 'textfield',
                        'holder' => 'h3',
                        'class' => 'title-class',
                        'heading' => __( 'Business Name', 'text-domain' ),
                        'param_name' => 'title',
                        'value' => __( '', 'text-domain' ),
                        'admin_label' => false,
                        'weight' => 0,
                        'group' => 'Listing',
                    ),

                    array(
                        'type' => 'textarea_html',
                        'holder' => 'div',
                        'class' => 'wpc-text-class',
                        'heading' => __( 'Description', 'text-domain' ),
                        'param_name' => 'content',
                        'value' => __( '', 'text-domain' ),
                        'description' => __( 'To add link highlight text or url and click the chain to apply hyperlink', 'text-domain' ),
                        // 'admin_label' => false,
                        // 'weight' => 0,
                        'group' => 'Listing',
                    ),

				),
			);
		}


		/**
		* Shortcode output
		*
		*/
		public static function output( $atts, $content = null ) {

			extract(
				shortcode_atts(
					array(
						'bgimg' => 'bgimg',
						'title'   => '',
					),
					$atts
				)
			);

  		$img_url = wp_get_attachment_image_src( $bgimg, "large");

        // Fill $html var with data
        $html = '
        <div class="wpc-directory-wrap">

            <img class="wpc-directory-image" src="'. $img_url[0] .'">

            <h2 class="wpc-directory-title">' . $title . '</h2>

            <div class="wpc-directory-text">'. $content .'</div>

        </div>';

        return $html;

		}

	}

}
new vcInfoBox;
Customizing Your WPBakery Visual Composer Add-on
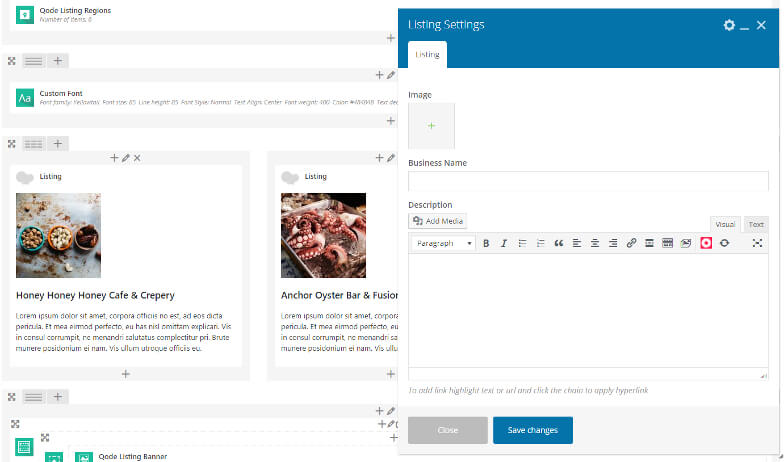
As we mentioned above, for this example we are making a directory style WPBakery Visual Composer Add-on. Looking at the code you just pasted you will see starting at line 24 that there is a function called map. This is passing an array of options and params which will structure our new add-on.
Next if you look at line 48 you will see the WPBakery Visual Composer elements name “Listing”. This is the name of the new add-on that we are adding. You can name this whatever you would like.
On line 51 using the category attribute it is allowing us to create a custom tab for your add-on in the VC list of elements. For this example we named our category WPC Directory, but you can change it to your liking as well. If you don’t add the category attribute, your element will be placed in the “All” tab.

VC Field Options
On lines 54 to line 88 you can see that there are 3 different arrays.
The array on line 54 is an array type attach_image. This array will allow us to add an image option to your new element.
The second array on line 65 is an array type textfield. This is what we will be using to add our Business Name option.
And the last array on line 77 is an array type textarea_html. This allows us to have a text area for our listing directory.
You can see on each array that we have the attributes heading. You can change this to have a custom heading for each option. On the third array you will also see the attribute description. Since we didn’t want descriptions on the first two options we did not include it on those. However, you can copy and paste the attribute to the first two options if you would like a description.

If you would like to add a new field type that isn’t in our example, here is a link that has a list of all the Visual Composer vc_map field examples.
Styling Our New Add-on
The last step to creating our custom WPBakery Visual Composer add-on is to do some styling! First let’s go back to our FTP and under our plugin folder wpc-directory let’s create a new folder and call it styling. Next, open the new folder you just created and let’s create a file called directory-styling.css.

Now that we have all the proper folders and files created, let’s go ahead and paste in our CSS that we have created for you:
/* Directory Styling */

.wpc-directory-wrap {
    border: 1px solid #dbdbdb;
    margin-bottom: 31px;
    padding-bottom: 28px;
}
.wpc-directory-image {
  object-fit: cover;
  width: 100%;
  height: 230px;
  margin-bottom: 10px;
}
.wpc-directory-title {
    color: #1e2427;
    font-family: 'Source Pro Sans', sans-serif;
    font-size: 22.5px;
    line-height: 27px;
    font-style: normal;
    font-weight: 600;
    letter-spacing: 0px;
    text-transform: none;
    margin-bottom: 6px;
    padding: 8px 30px 5px 30px;
}
.wpc-directory-text {
    font-size: 14px;
    line-height: 23px;
    padding: 0px 30px 0px 30px;
}
.wpc-directory-text a {
    color: #cd4335;
    font-weight: 600;
}
.wpc-directory-wrap img[src=""] {
    display: none;
}
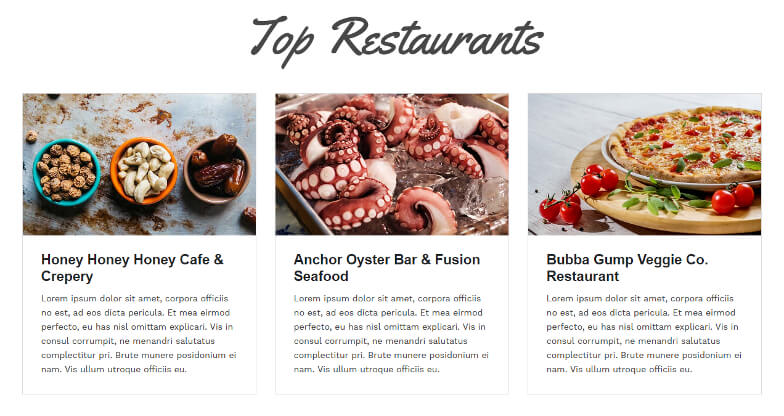
And that is it! Once you have saved all your files and activated your new plugin in the WordPress dashboard, you will have created your first WPBakery Visual Composer Add-on. If you did everything correctly you will have a new directory style visual composer element that will look like this:

Summary
Creating a WPBakery Visual Composer add-on can have a lot of perks. For example: Maybe you have some clients that are not the most tech savy people in the world, but they want to add more information later on that will have the same structure. Having an element will all the options in one place is a lot easier than having to use 3 different elements and making sure they don’t mess the styling up.
The nice thing about this is that you can use this example to create anything that you would need! If you do use this example to create something cool, we would love to see what you created by sharing it in the comments below.
We hope you found this blog useful, and as always if you have any questions feel free to reach out to us at any time!


